
(Photo by Timothy K. Hamilton, Thanks!!!)
Happy New Year!!!
Hope 2008 brings you lots of Joys & Happiness!!
(Note : I will be on a break for some time, and will be back with more recipes.)
(Photo by Timothy K. Hamilton, Thanks!!!)
Happy New Year!!!
Hope 2008 brings you lots of Joys & Happiness!!
(Note : I will be on a break for some time, and will be back with more recipes.)

Well who doesnt like Pineapples ? I bet there aren’t that many who dislike.
I for one like them a lot….I have prepared Pineapple Cake few times before, so I decided to go for muffins.
The muffins turned out very delicious, the soft sweet pineapple chunks in every bite made this muffin extra good!!
Pineapple Coconut Muffins
Ingredients
1 Cup All Purpose Flour
2 Tsp Baking Powder
2-3 Tbsp Sweetened Coconut Flakes
1/2 Cup Sugar
1/4 Cup Buttermilk
1/4 Cup Oil
1 Egg
2-3 Tbsp Milk
1/2 – 3/4 Cup Pineapple chunks
2 Tbsp Sliced Almonds(Optional)
Method
Preheat oven to 350 degree Farenheit.
Sieve the flour with the baking powder.
Mix in sugar & sweetened coconut.
In a separate bowl beat the egg, oil, buttermilk together until well blended.
Slowly add the flour mixture to the above mixture little at a time along with little milk & blend well until all the flour and milk is mixed in.
Chop the Pineapple into smaller chunks if big.
Add in the pineapple to the flour mixture and mix well.
Spoon the mixture into the muffin pan.
Sprinkle some sliced almonds on the top.
Bake for 20-30 mins or until a knife inserted at the center of a muffin comes clean.
Enjoy them over a hot cuppa tea like I did!!

I try to make sprouts an integral part of my daily food habits, but unfortunately end up making them rarely.
I always forget to soak them in time to get the sprouts & end up using them unsprouted….
But since its sinfull to pass up the healthy sprouts, I have revived my pledge. 🙂
I dont need to tell how beneficial consuming sprouts are.
Sprouts, be it from Chana, Moong or from any other beans are full with essential and balance nutrients.
I was very suprised to know that the vitamin content in seeds may increase from 100% to 2000%.
It is loaded with antioxidants, when consumed helps the damage against free radicles.
The bottomline is folks, eat sprouts as frequently as you can!!!
This is my mothers recipe & it is one of my comfort foods. Enjoy!!
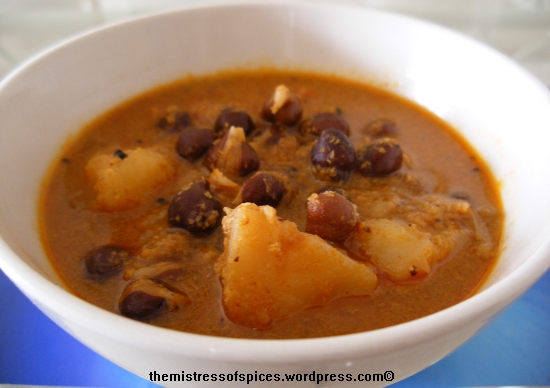
Chana Sprouts Curry
(Molake Saaru – For Kannada Folks)
Ingredients
1 Cup Kala Chana (yields 2 Cups Sprouts)
1 Big Onion
1 Potato Cubed
1 Brinjal
2-3 Tomatoes
1 Tsp Red Chilli Powder
1/2 Tsp Dhania Powder
2 Tbsp Oil
1/2 Tsp Mustard seeds
To Grind –
4 Tbsp Coconut Grated
3-4 Cilantro Sprigs
2 Cinnamon
2 Cloves.
Method
Heat just a tsp or two of oil & fry half of the sliced onion until the edges turn golden.
Remove from the flame. Let the onion cool.
Grind the listed items above with the fried onions.
When the coconut is ground smooth add the red chill & dhania powders & grind somemore.
Slice the Onion finely, make large chunks of potato & brinjal.
Heat remaining oil in a pressure pan/cooker. When hot add mustard & cracle.
Add the remaining half onion finely sliced. Saute until lite brown.
Stir in the potato chunks & saute for 2-3 mins. Add in the chopped tomatoes & cook untill soft.
Stir in the ground masala along with 2 cups of water.
When the curry is boiling add the chana sprouts & brinjal. Add salt.
Pressure cook for 3 whistles. And delicious Chana curry is ready.
It goes very well with Rice & Chapathis.

I love Capsicums/Peppers, they readily go into any dish, be it sambhar Or gravy.
Capsicum Sambhar is one among my favorites, many people dont use it in sambhars, well you’ve gotta try it to believe it… This is one partcular gravy which I am very fond of & it just tastes great. Dont go by the looks…just try it, you’ll fall in love & it’ll be your favourite as well. Yum.. This gravy tastes better than a restaurant one, do try it & let me know.
Note – Dear blogger friends, I am extremely sorry as I havent been keeping up with you all, I have missed so many of your posts, I apologize, But promise, you will see me soon. Please do leave your precious comments. 🙂
Capsicum Matar Masala
Ingredients –
1 Capsicum
1 Cup Peas
1/2 Tsp Ginger – Garlic Paste
1 Small Onion
1 Medium Tomato
3 – 4 Tbsp Tomato Sauce
1/2 Tsp Red Chilli Powder
1 Tsp Kasuri Methi
2 Pinch Garam Masala
1/2 Tsp Cumin/Jeera
1 Tbsp Oil
1/4 Tsp Turmeric
Salt as per taste
To Grind –
4 – 5 Tsp Coconut grated
7-8 Cashewnuts
2 Cloves
2 Cinnamon Pieces
1 Cardamom
Method –
Grind the Coconut along with the other given items to a smooth paste adding water.
Chop Capsicum into 1 inch square pieces. Crush a small piece of ginger with 1 clove of garlic to make the paste.
Chop onion and tomato finely. Dry Roast Kasuri Methi just until aromatic(crisp & changes its color).
Heat Oil in a pan/vessel, when hot add the cumin/jeera.
(You can add a little bit butter if you are not calorie conscious to enhance the taste.)
After a few seconds add the finely chopped onion. Saute untill lite brown.
Now add the ginger-garlic paste & further saute for a minute.
Add the chopped tomato, stir & let it cook for a few minutes until disintegrated.
Add the tomato sauce now & fry well for few more minutes.
Add Chilli powder to taste and turmeric as well. Stir well for a minute.
Now add the chopped capsicum & peas. Saute for a couple of minutes.
Add the ground coconut mixture along with a little water & salt. Mix well.
Cook for 5-7 minutes until the gravy thickens and the capsicum is just cooked.
Finally add the Garam Masala Powder & roasted Kasuri Methi, mix well.
After a couple of minutes switch off the heat.
Delicious Capsicum Matar Masala is ready!!! Serve with Roti/Chapatis. Enjoy!!!
I’m back!!!! Thanks Sharmi & Srivalli for enquiring about me…
The past few weeks had been soo hectic & could not blog, so now I have come up with a Spicy dish for you…
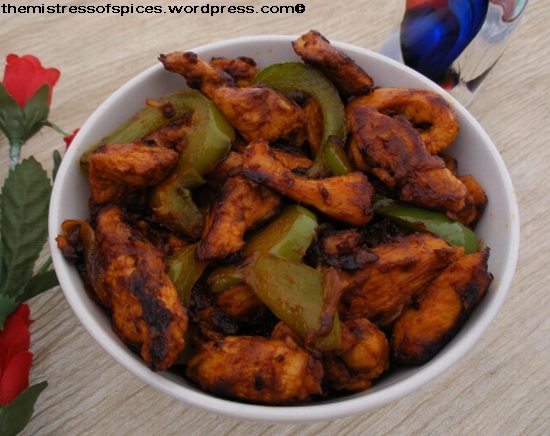
Let me confess, I dont like to eat Chinese food here in the US.
No offense but, first of all the odour in those restaurants makes me feel like throwing up.
Except to eat in Indian restaurants, I really dont eat out much, Chinese or otherwise.
Somehow I have never been able to adapt to any other cuisines. I am happy with my Indian food.
So when I want to eat some Indian Chinese its easy, I prepare Chilli Chicken & Fried Rice. 🙂
The Capsicum/Peppers added enhances the flavours of this wonderful dish.
Chilli Chicken
Ingredients
1 Lb -Chicken – Skinless, Boneless Breast
1 Onion
1/2 ” Ginger
1 Clove Garlic
1 Capsicum
2-3 Tbsp Oil
1 Tsp Red Chilli Powder
2-3 Tsp – Vinegar
2-3 Tsp – Soya Sauce
2 Tsp Ginger Garlic Paste
1-2 Tsp Corn Flour
1 Tsp Tomato Paste/Puree
1/2 Tsp Turmeric
Salt to Taste
Method
Wash & cut the chicken breast into cubes.
Apart from the first 6 ingredients, combine all the other ingredients, adjust Red Chilli Powder & salt to taste.
Make a smooth paste of it.
Now add the chicken cubes & mix so that the chicken is well coated with the marinade.
Refrigerate the marinated chicken for a minimum of 2 hours.
Slice Onions thinly. Finely chop Ginger & Garlic. Slice Capsicum into strips.
Heat Oil in a wide pan. When hot add the thinly sliced onions.
When onions turn transparent, add the finely chopped Ginger & Garlic.
Saute for 2 -3 minutes. Add the marinated Chicken.
Stir well & saute on high flame initially & then reduce flame to medium.
Keep stirring often so that the chicken wont get burnt, cook for 15-20 minutes.
Adjust the spices now if needed.
Now add the Capsicum strips & saute for a few more minutes.
Delicious Chilli Chicken Ready!!!!

Dear Dad, Happy Fathers Day 🙂
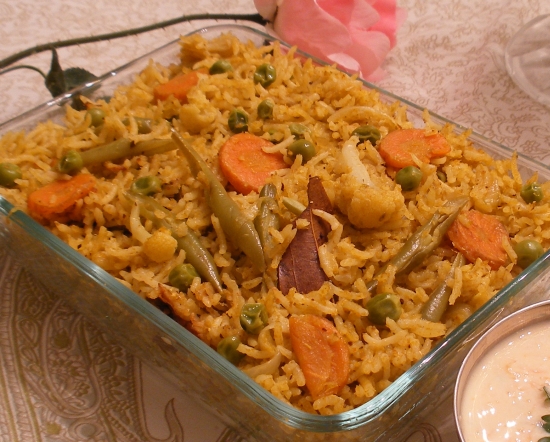
Hello, This week instead of my Lunch Plate I bring to you my favourite Vegetable Baath/Pulao.
We South Indians, particularly Kannadigas make variety of Baath’s with anything you can imagine with 🙂
Tomato Baath, Veg Baath, Vangi Baath, BisiBeleBaath etc etc…
A am a big fan of Baath & can live on them for days, unlike DH who doesnt like them for more than one meal in a month.
It is a perfect dish to empty out the veggies in the fridge 🙂
This one pot dish tastes heavenly with a raitha.
Anyways, here is my favourite & delicious Vegetable Baath, folks do try it.!!!
This is my first ever entry for Nupur’s A-Z Vegetables.
V For Vegetable Baath
Ingredients :
2 Cups Basmati Rice
2 Cups Mixed Veggies
(Green Beans, Peas, Carrots & Few Cauliflower Florets)
1 Large Onion
1/2 Tsp Jeera/ Cumin Seeds
10-12 Cashewnuts (Optional)
1/2-3/4 Tsp Red Chilli Powder
2 Bay Leaves
2 Cloves, 2 Cinnamon Sticks
1/2 Tsp Turmeric Powder
4 Tbsp Oil/Ghee
Salt to Taste
Grind To a Smooth Paste:
1/2 Medium Onion – Sliced
1 Medium Tomato – Sliced
1/4-1/2 Cup Coconut Grated
1 Tsp Roasted Poppy seeds
2 Jalepenos
6 Green Chilles
3-4 Garlic Cloves
1-2″ Ginger
2 Cloves
2″ Cinnamon
2 Cardamom
1/2 Bunch Coriander Leaves
Method :
Wash & chop veggies, I used less of cauliflower, because I didnt want its smell to dominate the Baath.
Veggies can be used in any proportions, also any other desired veggies could be added depending on your liking.
I used Jalepenos & Green Chilles, but you can just use Green chilles itself, just increase the quantity.
Slice the onion lengthwise thinly. Wash & soak the Basmati Rice in plenty of water.
Heat Oil/Ghee in a wide pan. Adding a little bit more oil adds to the taste & texture of this dish.
(If oil is reduced, the baath turns out very dry, so be liberal with oil here.)
When the oil gets hot add the Bay Leaf, Cloves & Cinamon.
When it tends to get brown, add the Jeera & Cashewnuts if using.
When the jeera splutters add the sliced onions. Saute until transparent.
Add the mixed veggies & saute for a few minutes.
Now drain the rice & keep aside.
Add the smoothly ground masala paste. Saute until the oil separates.
Add the Red chilli powder to taste, fry for 2-3 minutes.
Add the drained rice & fry well for a couple of minutes.
Add 3 & 1/2 Cups of water to the above , add salt to taste & stir well.
When the mixture starts to boil, mix once again & close the pan & reduce the flame to simmer.
After 20 minutes, turn off the flame. Let the pan cool well before serving. Enjoy!!!

Guys last weekend we had lunch at an Indian restaurant, hence couldnt post my lunch plate.
But here I am with a very simple lunch plate – Rice, Mysore Saaru, Alu Fry & Pachadi.
This Alu Fry prepared here is very simple & delicious.
It goes very well with a simple rasam or sambar.
Do try this, u’ll love it 🙂
ALU – FRY
(Potato Fry)
Ingredients :
4 Medium Potatoes
1/2 Tsp Jeera
Few Curry Leaves
1 Jalepeno
1/2 Tsp Turmeric
1/2 Tsp Dhania Powder
1/2 Tsp Red Chilli Powder
2 Tsp Kasuri Methi
3-4 Tsps Oil
Salt – as per taste
Method :
Boil Potatoes & cube them.
Heat Oil in a wide pan, add jeera seeds & curry leaves.
Quickly add thinly sliced Jalepeno. Stir & cook for 2-3 minutes.
Add Turmeric & salt. Stir & add the cubed potatoes. Mix well.
Add the Dhania & Red Chilli Powders. Stir everything.
After 2 minutes or so add crushed Kasuri Methi.
Cook on a low flame for few more minutes until done.


Puttu & Cherupayar is the most common breakfast/lunch/dinner menu of Keralites.
Like Kadala curry, Cherupayar curry also goes very well with puttu.
This Cherupayar Curry can be prepared in a jiffy & tastes great with puttu.
This curry also goes well with Chapathis/rotis & rice as well. Enjoy!!!
Here is the recipe for Cherupayar curry –
Cherupayar Curry
(Green Gram Curry)
Ingredients
1 Cup Whole Green Gram
3 Green Chilles Slit
1/2 Inch Ginger Grated or Finely chopped
1/2 Tsp Turmeric
1/2 Tsp Red Chiili Powder
1/2 Cup Grated Coconut – Ground to paste.
Seasoning
2-3 Tsp Oil
1/2 Tsp Mustard Seeds
2-3 Dry Red Chilles Broken
Curry Leaves
Method
Soak the whole green gram in water for about 15-30 mins.
In a pressure pan, add the soaked & drained green gram. Add 3 Cups Or enough water to cover the green gram.
Add few curry leaves, grated ginger, slit green chilles & turmeric. Stir.
Pressure cook for 2 whistles and simmer for about 5 minutes & turn off the flame.
After the cooker has cooled & released the pressure open it & put it back on flame.
If there is very little or no water, just add little water, but not too much.
(This curry is supposed to be a bit thick & not watery.)
Add the chilli powder & salt. Stir well & simmer for 7-8 minutes.
Add the ground coconut. (Instead of grinding, grated coconut can be added, both tastes equally good.)
In a separate pan heat 2-3 tsp of oil for seasoning.
When the oil is hot, add mustard seeds. When they pop add the broken red chilles.
Stir for a second & add the curry leaves.
Add the seasoning to the green gram curry, simmer for 2-3 minutes before switching the flame off.
Serve along with Puttu.

Thotakura – Mamidakayi Pappu, Rice, Zucchini Fry, Pachadi and Lotus Root bhajji was our delicious lunch today.
It had been ages since I prepared Thotakura(Dantinasappu in Kannada).
In my quest to eat greens, atleast now & then I cook them.
This pappu turned out delicious!! It was a very satisfying meal.
This is my entry for RCI.
Thotakura-Mamidikaya Pappu
(Amaranth-Green Mango Curry)
Ingredients
1 Cup Toor Dal
3 Cups Thotakura
1 Cup Green Mango Chopped
3 Green Chilles Slit
1/2 Tsp Red Chilli Powder – or as per taste
1/2 Tsp Turmeric Powder
Salt as per taste
Seasoning
2-3 Tsp Oil
1/2 Tsp Mustard Seeds
2 Green Chilles slit
Curry Leaves
2 Red Chilles
1/4 Tsp Hing
Method
Wash & chop the Thotakura(Amaranth) Leaves finely.
Green Mango is preferable, Chop Mango along with the skin into small cubes.
In a pressure pan, add 3-4 cups of water and bring it to a boil.
To the water add washed Toor dal, chopped Thotakura, Mango Cubes, Green Chilles slit and Turmeric powder. Stir.
Pressure cook for 2 whistles & let it simmer for a few minutes & remove.
Once the pressure cooker cools, mash the ingredients. And again keep it on medium flame.
Heat oil in a pan for seasoning, add mustard seeds, when pops, add the green chilles & curry leaves.
Then add dry red chilli broken into 2-3 pieces. Add hing, stir & add this to the cooked dal.
Add salt & Red chilli powder, stir everything.
Simmer for 5-7 minutes.
Delicious pappu is ready enjoy!!!!

I like cauliflower/gobi so does DH. This is the way I usually cook gobi.
The curry goes very well with rotis, do give it a try.
Gobi Matar Masala
(Cauliflower & Peas Curry)
Ingredients
2 Cups Gobi Flowerets
1/2 Cup Peas
2-3 Tbsp Tomato Sauce
1 Tsp Red Chilli Powder
Garam Masala- to taste
1/2 Tsp Turmeric
Dry Roast :
1 Tsp Dhania
1/2 Tsp Cumin
6 – 8 Cashewnuts
1″ Cinammon
1 Clove
Grind the dry roasted ingredients with :
1 Onion
2-3 Green Chilles
1 Garlic – Big clove
1 Ginger – Small piece
Method
Heat 2 Tbsps of oil, when hot add the ground masala.
Add the red chilli powder, Turmeric & Garama masala powders.
Mix & fry the masala well, until oil separates from it.
I microwave the washed flowerets to reduce cooking time.
You can skip cooking gobi & directly add to the gravy.
Mix well until the gobi is coated with the masala.
Add peas, salt & a cup of water.
Simmer the curry for a few minutes.
Adjust the spices if needed & add the tomato sauce now.
Cook further for a few more minutes just until the gobi is cooked but not mashed up.
Enjoy!!!!


